Creating Custom Work Order Fields
Creating custom fields helps a company define what needs to be tracked and how that should be done. This is especially important when the Field Nation tracking system and your corporate tracking system do not use the same system.
1.
Select  from the
Company Administration Box to display the Company Settings screen.
2.
Click ![]() to display
the Custom Label Management screen.
to display
the Custom Label Management screen.

3.
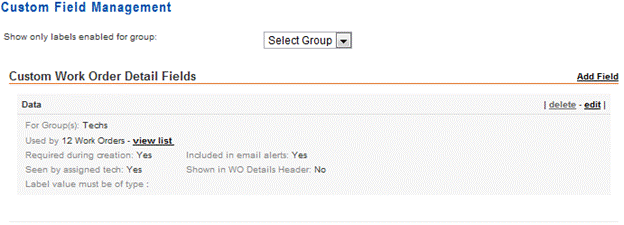
Select a group for the field from the drop-down menu. 
4. Click “Add Field” to access the Manage Custom Label box.
![]()
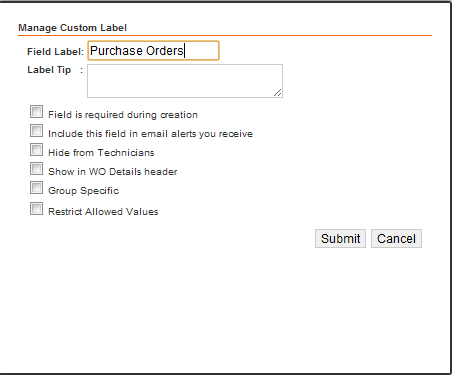
5. Choose a name for your custom field.

The following options are available for custom work order fields:
·
Field Label:
Field Label is where you type/enter the name of the field.
·
Label Tip:
The Label Tip field shows specific instructions related to the field label.
This field accepts any text.
·
Field is required during creation:
Checking the “Field is required during creation” box means the field MUST
BE included in every work order.
·
Include this field in email alerts you receive:
Checking “Include this field in email alerts you receive” adds this field
information to all of your e-mail alerts related to the work order.
·
Hide from Technicians:
Checking “Hide from Technicians” makes the field invisible to the
technician working on the project.
·
Show in WO Details header:
Checking “Show in WO Details header” makes the field appear in the details
header.
·
Group Specific:
Checking “Group Specific” means the label applies only to the selected
group.
·
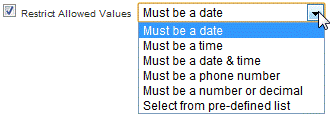
Restrict Allowed Values:
Checking “Restrict Allowed Values” Means only specific values are
acceptable in the field.

Ø
Must be a date:
Limits the field information to dates.
Ø
Must be a time:
Limits the field information to times.
Ø
Must be a date & time:
Limits the field information to a date and time.
Ø
Must be a phone number:
Limits the field information to a telephone number.
Ø
Must be a number or decimal:
Limits the field information to a whole and decimal numbers.
Ø
Select from a pre-defined list:
Allows the user to add information from a prebuilt list.
6. Click ![]() to create the new field.
to create the new field.
Custom fields can be built with a pre-defined list. This is useful for adding information not included in a basic work order.
NOTE:
This procedure presumes you are working in the Manage Custom Label menu.
1.
Check the Restrict Allowed Values box. ![]()
2.
Click the down arrow to the right of the Restrict Allowed Values
drop-down menu. ![]()
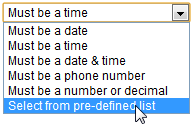
3.
Choose Select from a predefined list. 
4.
Click the Add Value Option button to create additional fields. ![]()
5.
Type information into the ![]() first
field.
first
field.
6.
Check the Allow Blank Values box to give the user an option of not
filling in the field.![]()
7. Repeat steps 4-6 for each additional item on the list.
8.
Click ![]() to create
the field.
to create
the field.

Creating Custom Fields to track Work